nginx
是什么
高性能的HTTP和反向代理服务器
重要概念
反向代理
正向代理:客户端不能直接访问网络资源,所以,在客户端配置代理服务器,客户端通过代理服务器访问资源。

反向代理:客户端把请求发给反向代理,反向代理问服务器要数据再返回给客户端
优点:隐藏了真实服务器IP地址
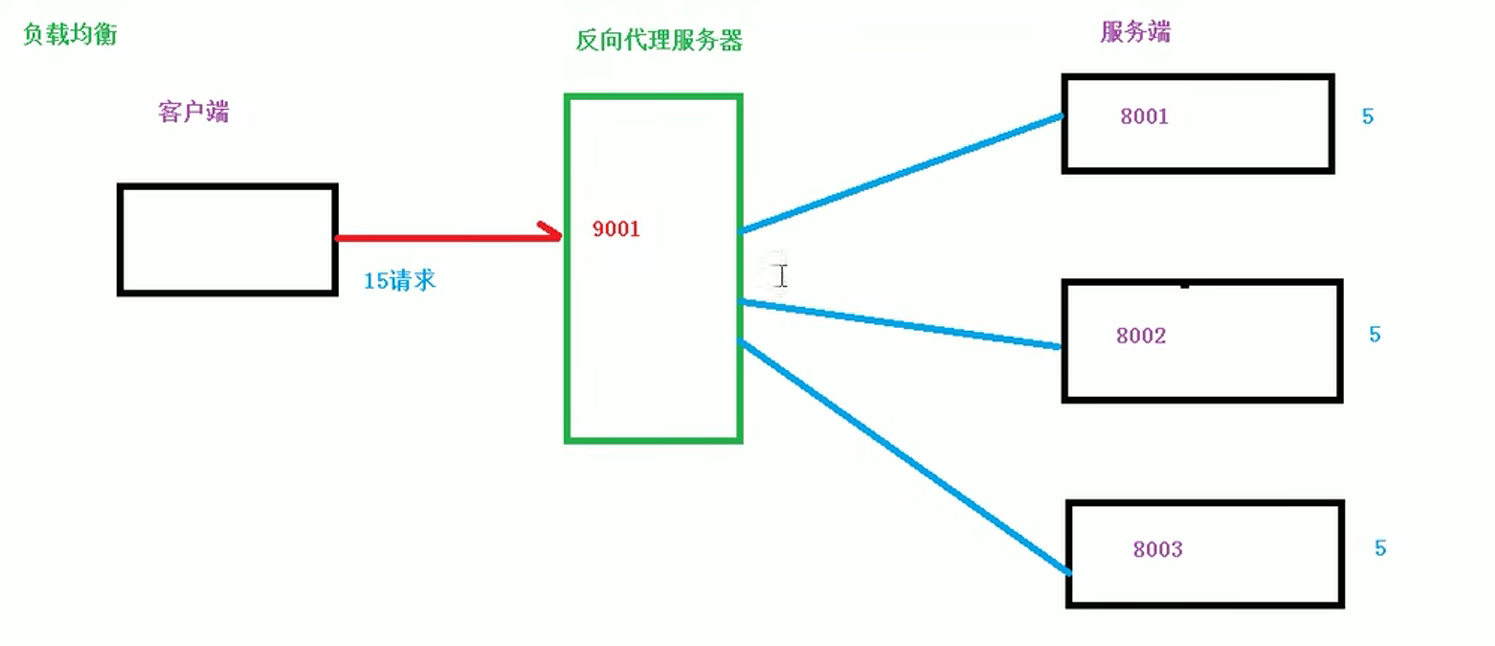
负载均衡
客户端同时发出很多请求,反向代理收到请求后,把请求平均发给多台服务器处理,每台服务器承受的请求差不多
动静分离
nginx可以把静态资源和动态资源分开部署在不同的服务器上
nginx安装
1、下载nginx的依赖
[root@localhost nginx-1.25.1]# yum install -y gcc-c++ pcre pcre-devel zlib zlib-devel openssl openssl-devel
2、在Linux系统上下载nginx
[root@localhost vagrant]# wget http://nginx.org/download/nginx-1.25.1.tar.gz
3、便于管理,可以创建一个文件夹保存(可跳过)
[root@localhost vagrant]# mkdir /usr/web	#创建文件夹
[root@localhost vagrant]#  mv nginx-1.25.1.tar.gz /usr/web #将包移动到指定文件夹下
[root@localhost vagrant]# cd /usr/web	#进入到指定文件夹下
[root@localhost web]# ls	#查看文件夹下内容
nginx-1.25.1.tar.gz
注:# 后是命令解释
4、解压并进入nginx文件夹下
[root@localhost web]# tar -zxf nginx-1.25.1.tar.gz	#解压文件夹
[root@localhost web]# cd nginx-1.25.1	#进入到nginx文件夹下
5、配置nginx
[root@localhost nginx-1.25.1]# ./configure
出现如下信息,代表nginx配置成功
Configuration summary
  + using system PCRE library
  + OpenSSL library is not used
  + using system zlib library

  nginx path prefix: "/usr/local/nginx"
  nginx binary file: "/usr/local/nginx/sbin/nginx"
  nginx modules path: "/usr/local/nginx/modules"
  nginx configuration prefix: "/usr/local/nginx/conf"
  nginx configuration file: "/usr/local/nginx/conf/nginx.conf"
  nginx pid file: "/usr/local/nginx/logs/nginx.pid"
  nginx error log file: "/usr/local/nginx/logs/error.log"
  nginx http access log file: "/usr/local/nginx/logs/access.log"
  nginx http client request body temporary files: "client_body_temp"
  nginx http proxy temporary files: "proxy_temp"
  nginx http fastcgi temporary files: "fastcgi_temp"
  nginx http uwsgi temporary files: "uwsgi_temp"
  nginx http scgi temporary files: "scgi_temp"
6、编译安装nginx
[root@localhost nginx-1.25.1]# make&&make install
出现如下信息,代表安装成功
make[1]: Leaving directory `/usr/web/nginx-1.25.1'
7、运行nginx
[root@localhost local]# cd /usr/local/nginx/sbin
[root@localhost sbin]# ./nginx
8、查看nginx状态
[root@localhost sbin]# ps -ef| grep nginx
root      7489     1  0 02:02 ?        00:00:00 nginx: master process ./nginx
nobody    7490  7489  0 02:02 ?        00:00:00 nginx: worker process
root      7621  2632  0 02:05 pts/0    00:00:00 grep --color=auto nginx
9、查看安装结果
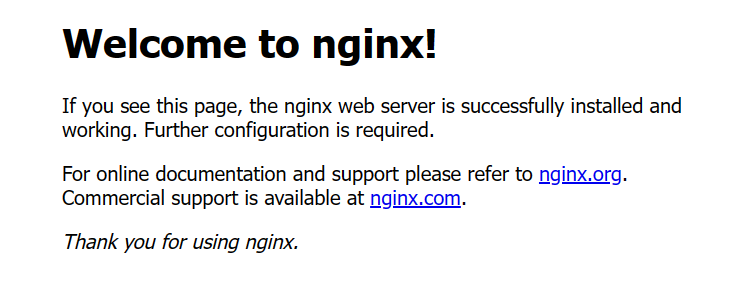
[root@localhost conf]# curl http://localhost:80
<!DOCTYPE html>
<html>
<head>
<title>Welcome to nginx!</title>
<style>
html { color-scheme: light dark; }
body { width: 35em; margin: 0 auto;
font-family: Tahoma, Verdana, Arial, sans-serif; }
</style>
</head>
<body>
<h1>Welcome to nginx!</h1>
<p>If you see this page, the nginx web server is successfully installed and
working. Further configuration is required.</p>

<p>For online documentation and support please refer to
<a href="http://nginx.org/">nginx.org</a>.<br/>
Commercial support is available at
<a href="http://nginx.com/">nginx.com</a>.</p>

<p><em>Thank you for using nginx.</em></p>
</body>
</html>
10、可以直接访问浏览器http://你的ip地址:80
如果出现下图,表示安装成功
注意:如果是在云上操作,需要配置安全组,把80端口开放出来
nginx的常用命令
1、使用命令之前,必须要进入到nginx目录下 /usr/local/nginx/sbin
2、查看nginx版本号
[root@localhost sbin]# ./nginx -v
nginx version: nginx/1.25.1
3、查看nginx进程状态
[root@localhost sbin]# ps -ef | grep nginx
4、开启nginx
[root@localhost sbin]# ./nginx
[root@localhost sbin]# ps -ef | grep nginx
root      8175     1  0 03:12 ?        00:00:00 nginx: master process ./nginx
nobody    8176  8175  0 03:12 ?        00:00:00 nginx: worker process
root      8178  2632  0 03:12 pts/0    00:00:00 grep --color=auto nginx
###此状态nginx开启状态
5、关闭nginx
[root@localhost sbin]# ./nginx -s stop
[root@localhost sbin]# ps -ef | grep nginx
root      8172  2632  0 03:10 pts/0    00:00:00 grep --color=auto nginx
##### 此状态nginx为关闭状态
6、重新加载nginx(修改配置后一般使用这个命令)
[root@localhost sbin]# ./nginx -s reload
nginx配置文件
查看nginx配置
位置(以我的案例为例)在/usr/local/nginx/conf文件夹下
[root@localhost conf]# ls
fastcgi.conf            koi-utf             nginx.conf           uwsgi_params
fastcgi.conf.default    koi-win             nginx.conf.default   uwsgi_params.default
fastcgi_params          mime.types          scgi_params          win-utf
fastcgi_params.default  mime.types.default  scgi_params.default
打开nginx.conf文件(nginx的配置文件)
[root@localhost conf]# vi nginx.conf
退出(ESC + :wq)
nginx配置文件组成
1、全局块
#user  nobody;
worker_processes  1;	# 处理并发的数量

#error_log  logs/error.log;
#error_log  logs/error.log  notice;
#error_log  logs/error.log  info;

#pid        logs/nginx.pid;

events {
    worker_connections  1024;   #支持最大的连接数(nginx和用户的网络连接)
}
2、http块
2.1、http全局块
http {
    include       mime.types;
    default_type  application/octet-stream;

    #log_format  main  '$remote_addr - $remote_user [$time_local] "$request" '
    #                  '$status $body_bytes_sent "$http_referer" '
    #                  '"$http_user_agent" "$http_x_forwarded_for"';

    #access_log  logs/access.log  main;

    sendfile        on;
    #tcp_nopush     on;

    #keepalive_timeout  0;
    keepalive_timeout  65;

    #gzip  on;
2.2、http server块(主要配置区域)
    server {
        listen       80;	# 监听端口
        server_name  localhost;		# 主机名称

        #charset koi8-r;

        #access_log  logs/host.access.log  main;

        location / {
            root   html;
            index  index.html index.htm;
        }
nginx配置发布vuepress项目
1、把项目放到指定目录下,我的博客放到了/srv/xue-blog目录下
2、进入配置文件,打开配置文件
[root@iZ8vb6tl7e1nrt9275ww9zZ logs]# cd /usr/local/nginx/conf
[root@iZ8vb6tl7e1nrt9275ww9zZ conf]# vi nginx.conf
3、修改配置文件
    server {
        listen       80;#nginx监听的端口号
        server_name  xx.xx.xx.xx; #服务器的ip地址

        #charset koi8-r;

        #access_log  logs/host.access.log  main;

        location / {
            root   /xx/xx/; # 文件的地址
            index index.html;
            try_files $uri $uri/ /index.html;
        }
4、关闭所有线程(因为之前有端口占用报错),重启nginx
[root@iZ8vb6tl7e1nrt9275ww9zZ sbin]# pkill nginx
[root@iZ8vb6tl7e1nrt9275ww9zZ sbin]# ./nginx
关于防火墙
如果开启了防火墙,需要开放对外访问的端口
[root@localhost vagrant]# firewall-cmd --add-port=8080/tcp --permanent
success
然后重启防火墙
[root@localhost vagrant]# firewall-cmd --reload
success
查看已经开放的端口号
[root@localhost vagrant]# firewall-cmd --list-all
public (active)
  target: default
  icmp-block-inversion: no
  interfaces: eth0 eth1
  sources:
  services: dhcpv6-client ssh
  ports: 80/tcp 8080/tcp 6379/tcp 3306/tcp
  protocols:
  masquerade: no
  forward-ports:
  source-ports:
  icmp-blocks:
  rich rules: